Trade Show Booth Design Ideas: 10 Ways to Plan a 10x10
 Tomas Amaya
July 15, 2026Updated October 29, 20269 min read
Which design ideas work in a 10x10 trade show booth?
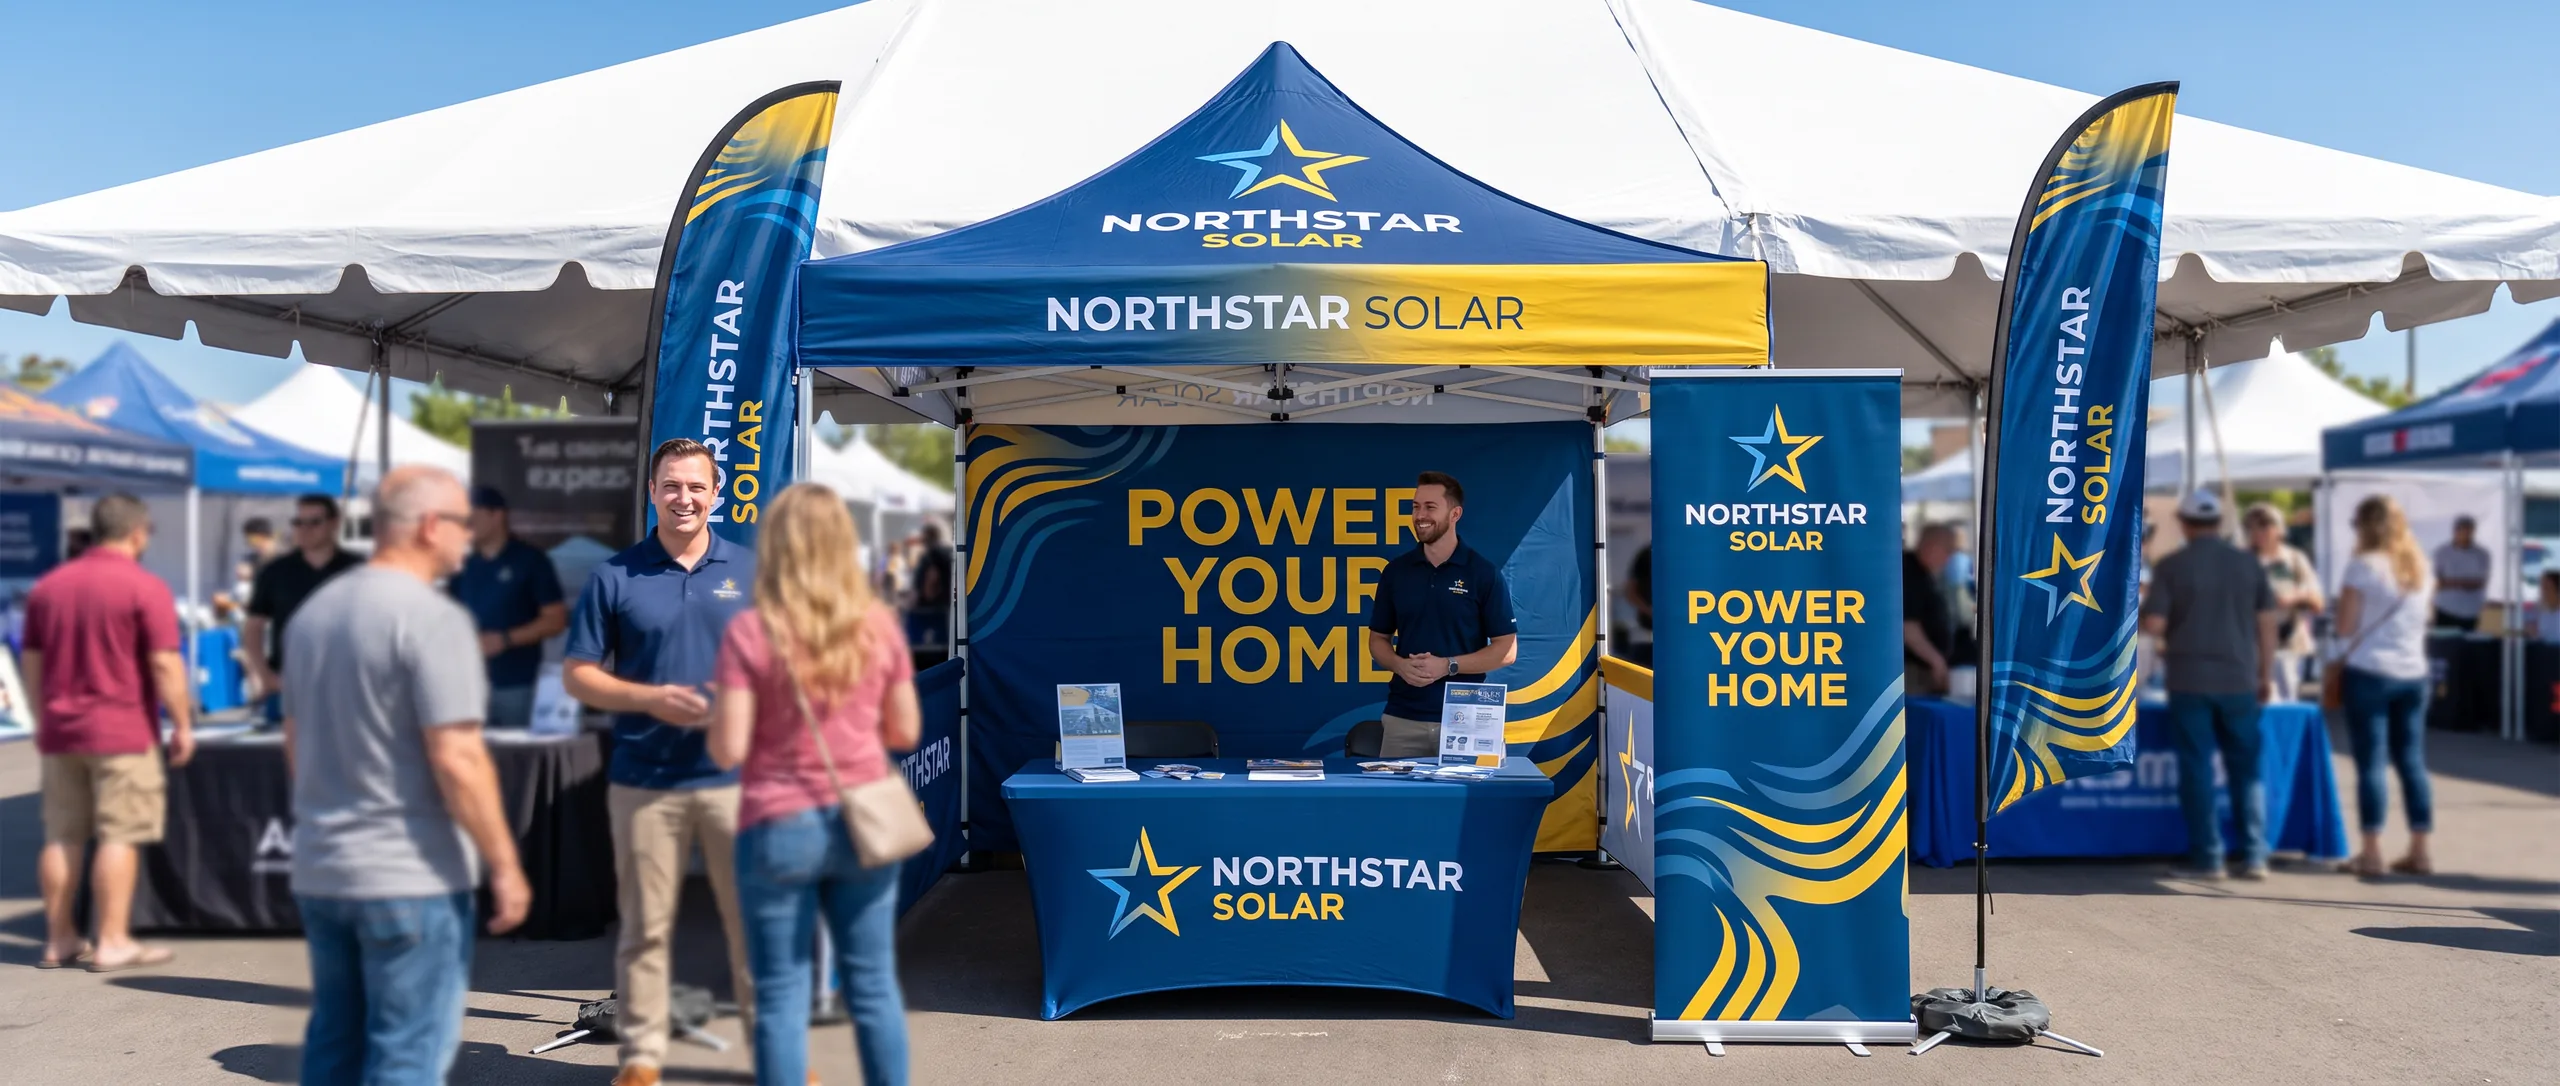
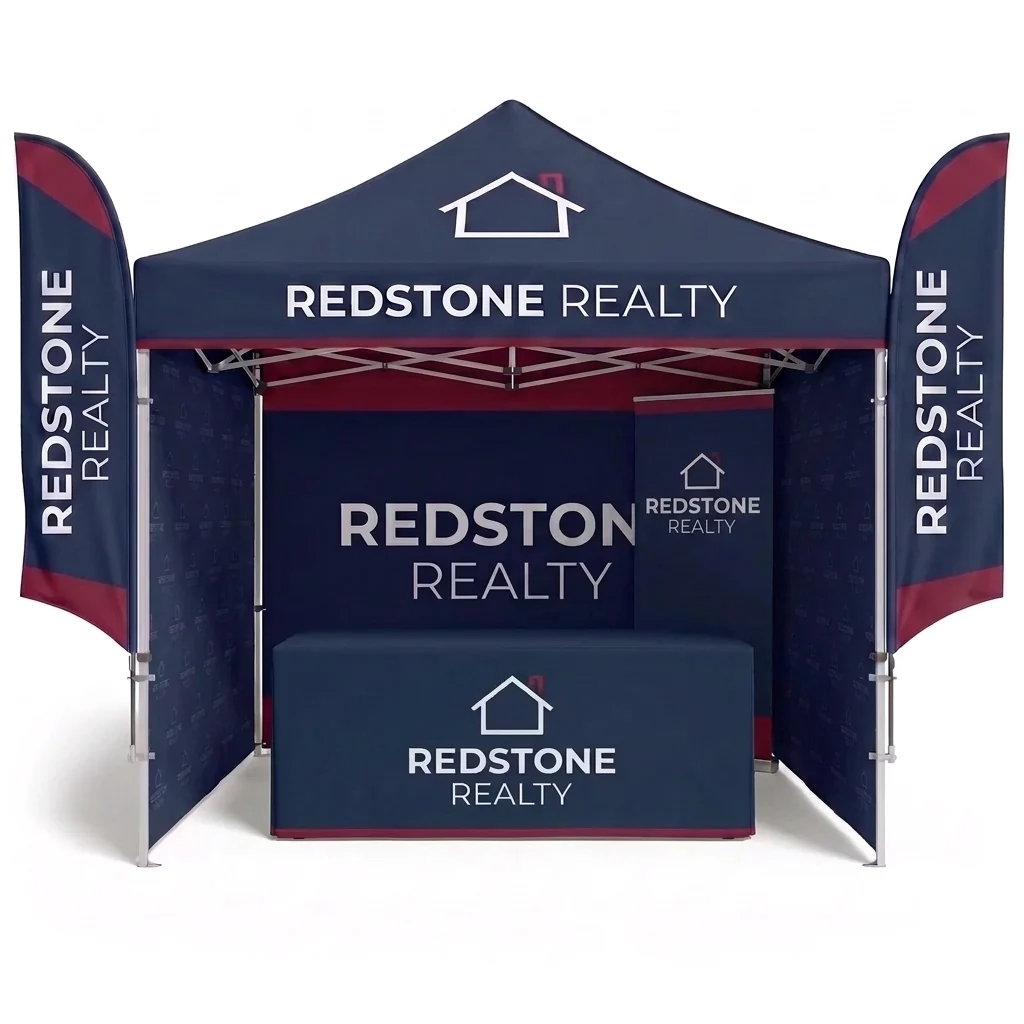
Plan one message and an open entry. Inline Graphics' 10x10 Showstopper V6 kit has a polyester canopy, three walls, 6ft open-back cover, two 10.5ft flags and Standard 33x81 retractable for $2,653.59. Design is included; production takes 3 to 4 business days after artwork approval, printed in the USA with flat $10 nationwide shipping per kit.
Give every display surface a job before adding more artwork. Visitors need to recognize the business, understand the offer and see how to enter or respond. A small booth gets confusing when all three messages compete on every piece.
These ten ideas are general design practice for a 10x10 space, indoors or outdoors. They focus on the graphics and layout you can actually plan around. Your exhibitor manual determines which structures, heights and fixtures are permitted.
For an outdoor space where the equipment is allowed, the 10x10 Showstopper package coordinates the canopy, walls, table front, flags and entry banner. Indoors, start with the permitted trade show display options and adapt the same message hierarchy.
What are ten concrete ways to improve a small booth?
Use one main message, place branding at two viewing levels and arrange the entry before filling the space with display pieces.
1. Give the back wall one main message
Put the principal offer on the rear graphic where visitors can read it before entering. For a product seller, that might identify the product category and its distinguishing feature. For a service booth, it might describe the one problem you help solve.
Keep the supporting copy subordinate. A complete service list belongs on a handout or linked page. Preview the wall with the table in front of it so the headline does not disappear behind the display.
2. Place the logo at eye height and above the crowd
Use a visible logo on the rear display for people approaching the booth. For an approved outdoor canopy, repeat the mark on its valance so nearby tables and visitors do not hide every instance of the business name.
This is a hierarchy, not a reason to fill every inch with logos. Leave clear space around the mark and preserve its original proportions. Indoor exhibitors must keep overhead branding within the manual's permitted heights and structures.
3. Leave the entry side open
Put a browsing table along a side or toward the back when the goal is for people to step inside. Reserve an uninterrupted route from the aisle to the product or conversation area. Keep stock cartons and staff bags out of that route.
For a quick sales counter, a front table may be intentional, but choose it knowing that visitors will browse from the aisle. Sketch the interaction you want before committing to the table position.
4. Match the fitted table cover to the rear graphic
Carry the same background color, logo treatment and type style across the table front and back wall. Put the table logo where displayed products will not hide it, and avoid placing essential information down near visitors' shoes.
Measure the physical table. A 6ft fitted cover fits 72 x 30 x 30 in; an 8ft cover fits 96 x 30 x 30 in. A cover with the right artwork but the wrong dimensions will not give you the intended presentation.
5. Use flags for distance recognition
Give a flag a short identification task, such as the business name or product category. It is a poor place for small prices, paragraph copy or a code intended to be scanned close up.
Frame-mounted flags belong with their compatible holders. Check their clearance and permitted height before ordering for an indoor event. The Showstopper kit includes two single-sided 10.5ft feather flags with frame mounts; a mirrored image shows through on the reverse of single-sided flags.
6. Put one retractable near the aisle
Use the entry banner for the next action: request a demonstration, browse a particular product or ask about an offer. Place it inside the booth boundary where its base does not interrupt entry. Keep the useful message above nearby products.
A retractable is also easy to update without redesigning the canopy. Keep it protected from exposed outdoor wind and weather. Do not assume that standing beneath a canopy gives the stand an outdoor wind rating.
7. Connect the QR code to a specific offer
Put the code beside a brief instruction that explains what scanning delivers. A code for an event offer should open that offer, rather than a homepage that makes the visitor start searching again.
Include a short readable address as another route. Test the printed code on more than one phone, at the distance a visitor would naturally stand. Check the page while signed out and make sure the form or purchase path works on a phone.
8. Light the retractable graphic where permitted
The Standard 33 x 81 in retractable stand with a single-sided UV-printed fabric insert and LED light option costs $331.99 for one complete configured stand. Aim the compatible light at its graphic to make that message easier to see under the venue's existing lighting.
This is a banner-stand option, not lighting for the tent. Confirm electrical access and approved cable handling with the venue before selecting it. That total does not mean the Showstopper package automatically includes the LED option.
9. Separate display space from checkout space
Choose a defined place for the payment reader, order form or conversation. A visitor trying to inspect a product should not have to stand in the checkout queue. Keep bags and transaction supplies at the selling spot so staff do not repeatedly cross the booth.
If you sell several product types, organize them by use or category. Show enough variety to explain the range and keep replenishment stock out of view. That leaves the display readable when more visitors arrive.
10. Plan two layouts for the same graphics
Sketch an outdoor tent layout and an indoor display layout before assuming that the same structure works everywhere. Indoors, a permitted freestanding rear display, fitted table cover and retractable can carry the same visual hierarchy without a canopy.
Check the exhibitor manual first. Some halls may not allow a tent, and covered structures can have additional requirements. Canopy walls attach to the tent frame; they are not standalone freestanding backdrops. Choose appropriate display hardware for the permitted indoor layout.
How much do the printed design pieces cost?
The complete V6-frame 10x10 Showstopper package costs $2,653.59, while standalone display items can support a smaller or indoor layout.
The package uses 6 oz polyester for its canopy and single-sided full walls, 8.8 oz polyester for its 6ft open-back fitted cover, and two single-sided 10.5ft feather flags with frame mounts. It includes ropes, stakes and a standard carry bag. Its three walls cover the back and sides, leaving the entry open; no folding table is included.
| One item or configured kit | Price |
|---|---|
| Complete 10x10 Showstopper kit with V6 frame, custom canopy, three full walls, 6ft open-back fitted cover, two 10.5ft flags and Standard 33 x 81 in retractable banner and stand | $2,653.59 |
| Standard 33 x 81 in retractable stand with single-sided UV-printed fabric insert, no LED option | $213.99 |
| Standard 33 x 81 in retractable stand with single-sided UV-printed fabric insert and LED light option | $331.99 |
| Standalone 6ft open-back fitted table cover, 8.8 oz polyester, fits 72 x 30 x 30 in | $235.39 |
| Standalone 8ft open-back fitted table cover, 8.8 oz polyester, fits 96 x 30 x 30 in | $267.49 |
Do not buy an extra standard retractable or 6ft cover to complete the base Showstopper kit; those pieces are already included. The standalone rows are alternatives for other layouts. Use the 10x10 trade show booth cost guide for broader budget comparisons.
How do you turn the layout into print-ready artwork?
Approve the layout as a set so the business name, offer and destination agree across every printed piece.
Canopy and package orders include artwork design, and the AI image fee is waived. Send your existing logo, files or ChatGPT and other AI images with the planned display positions. A free digital proof is emailed after ordering, and nothing prints until approval.
Separate non-canopy items have no production setup fee. Existing files go through AI image to print for $14.99 per item. Design it for me is +$29.99 with two revisions, free when the item is $499 or more.
Check any required fire documentation before buying a tent. No fire or flame-retardant rating is published for this canopy. Government venue guidance, such as the National Park Service event planning guide, illustrates that structure requirements are site specific. Rules vary by city, county, state, venue and HOA where applicable; check yours and ask Inline Graphics before ordering if a certificate is required.
How much lead time should you leave?
V6-frame packages need 3 to 4 business days in production after artwork approval, with shipping transit afterward.
Approve on a weekday before 12 PM Central and production starts the next business day. Upgraded frames take about 2 weeks. A Standard retractable has next-business-day production after approval, but its shorter schedule does not shorten a package's schedule.
The package ships as one kit for one flat $10 ground shipping charge nationwide. Separate products each have a $10 charge. Ground transit is about 3 business days; leave time for proof changes, inspection and packing rather than relying on an exact arrival date. For choosing equipment around travel and storage, read the portable trade show display buying guide.
Need trade show booth displays or other custom printing? Inline Graphics helps businesses, churches, schools, and event organizers across the country design and print cards, banners, signs, decals, displays, and marketing materials that get noticed. Contact us today for a quote.
Frequently Asked Questions
Use one main message on the rear display, a recognizable logo, a clear entrance and a defined offer near the visitor's next step. Keep stock and staff belongings behind the display rather than filling the entry.
One 10x10 Showstopper package is $2,653.59 with a V6 frame, full-custom 6 oz polyester canopy, three full printed walls, 6ft open-back fitted cover, two single-sided 10.5ft feather flags with frame mounts, and Standard 33 x 81 in retractable banner and stand. Design is included.
Check the exhibitor manual and obtain the organizer's confirmation before planning an indoor tent. A purchased 10x10 space does not establish permission for a covered structure. Check height, sightline, wall, flag, electrical and fire-document requirements as applicable.
One Standard 33 x 81 in retractable stand with a single-sided UV-printed fabric insert and the LED light option is $331.99. That is a complete configured stand price, not the price of a loose light. It is not tent lighting.
Send visitors to one useful destination, such as the offer, signup or product page discussed on the sign. Put a short explanation beside the code and test the printed code on a phone before the event.
The V6-frame package takes 3 to 4 business days in production after artwork approval. Upgraded frames take about 2 weeks. Ground shipping takes about 3 business days after production, and no arrival date is guaranteed by those estimates.
Related Articles
10x10 Trade Show Booth: Print Costs and Budget Builds
A 10x10 trade show booth can start with 2 printed pieces: a table throw and a retractable [...]
Read More: 10x10 Trade Show Booth: Print Costs and Budget Builds
Portable Trade Show Display Buying Guide: Sizes and Prices
Portable trade show displays start at $106.99 for a tabletop stand. Compare 8 portable displays [...]
Read More: Portable Trade Show Display Buying Guide: Sizes and Prices
Trade Show Display Mistakes: One Headline on the Wall
A back wall becomes hard to scan when it is full of paragraphs. A tension fabric stand is 36 by [...]
Read More: Trade Show Display Mistakes: One Headline on the Wall
10x10 Trade Show Booth Ideas: Make a Small Booth Look Bigger
A 10 ft SEG backwall is $974.99 with frame and bag and spans 118 x 89 in of a 10x10 booth. [...]
Read More: 10x10 Trade Show Booth Ideas: Make a Small Booth Look Bigger